

Explore creating art focused on the Element of Art: Texture that features drawing Fruits and Veggies, perfect for Homeschooling or Distance Learning. This is a free, easy to do, quick art lesson that focuses on teaching the Element of Art Texture to kids. This is an easy to implement idea for kids to do as an art project at home or in the classroom. Perfect for kids from grades 2 to 7! Scroll through to follow the step-by-step, or scroll to the bottom to find the full YouTube Video tutorial embedded in this post!
This post contains affiliate links, including links to my own books on Amazon. As an Amazon Associate I earn from qualifying purchases.
What is the Element of Art: Texture?
Texture is the Element of Art that has to do with the perceived texture of an object. Texture can be actual, real texture as you would get in sculpture, or it can be implied texture as in two-dimensional works and how we THINK an object would feel if we would touch it.
Line and Value is used to create Texture in two-dimensional works. We create Texture to tell our viewer if the subject in our artworks is rough, smooth, fuzzy, prickly, slimy, or fluffy.
Want more texture lessons ready to teach? My Elements of Art Texture Art Lessons include lessons, worksheets and activities all about texture, and the Watercolor Flamingo Texture Art Project is a fun way for students to show feathers with line and value. For all seven elements, take a look at the Elements of Art Bundle: 60 Art Lessons.

How-To Draw Fruits and Veggies that Explores the Element of Art: Texture
Let’s create Textured Fruits and Veggies! Art Lessons for learning art at home or distance learning with paper and your choice of medium! Create a cute Art Project that explores the Element of Art: Texture and other curricular content with this art tutorial for kids that makes learning in the classroom, e-learning, or homeschooling art easy to do. Use whatever mediums or materials that you have and follow along with this tutorial and learn how to apply the element of art, texture! This is a quick and easy, hands-on drawing and art tutorial that you can do with kids at home or in the classroom. Scroll to the bottom if you would like to watch the video instead!

Step 1
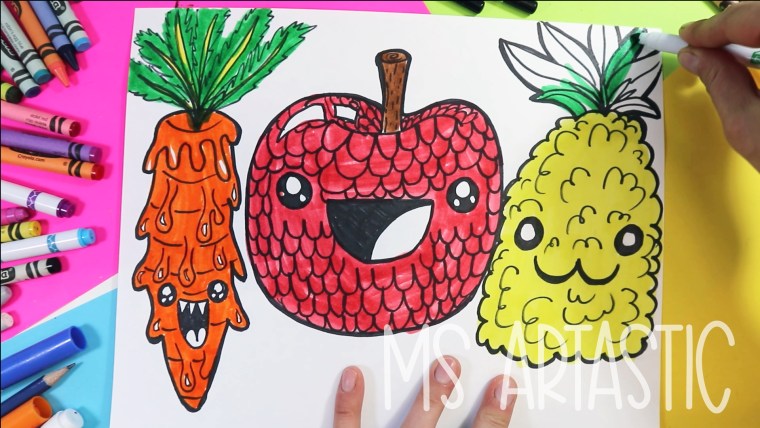
Use a black marker to draw the shape of your apple. Draw two eyes with a mouth in the center of the apple, between the eyes.

Step 2
Use your marker to draw areas for the “shine” or “glare of light” at the top of the apple.
Draw a tongue in the mouth with a curved line and color in the dark area of the mouth.
Draw curved lines to create scales on your apple!

Step 3
Finish your apple and thicken up the perimeter line. Draw the body of your pineapple with curving lines.

Download Free Art Worksheets for Kids
Step 4
Draw a face on your pineapple. Add curving lines on the inside of the pineapple to make it look soft and fluffy instead of sharp and pokey. Add leaves on the top of your pineapple.

Step 5
Draw the body and greens on your carrot. Draw the carrot with drooping curved lines to make it seem like slime is dripping down the body. Draw he carrot greens at the top and add two eyes in the bottom third.

Step 6
Draw more drips and goo drops on the body. Add a mouth with sharp teeth, and curving, horizontal stripes to create some cool carrot texture.

Step 7
Color the fruit with felt markers.
Step 8
Use white pencil crayon or wax crayon for highlights. Use black for shadows. This will make your fruit pop off the page!

You’re now done!
Once your done adding highlights and shadows, your artwork is complete. Sign your name and display it! Put it in a frame and place it in your kitchen for unusually themed artwork that explores the Element of Art: Texture.
Pair this lesson with a picture book: Eating the Alphabet by Lois Ehlert is a colorful alphabet book of fruits and vegetables, a fun way to get students thinking about which fruit or veggie they want to draw. And if you want more ways to teach texture and the other elements, my own book, Elements of Art, is on Amazon too.

Watch the YouTube Video Tutorial!
Helpful Art Resources for Teachers


10 Lessons on the Element Texture for your students! Students will learn and apply the elements of art through a variety of instructional and informational lessons and worksheets. Learn a variety of techniques and apply the elements to art projects or sketchbook work.
Read My Latest Blog Posts:
-The BEST Picture Books that Teach about Art for Kids
-The BEST Books that Teach Art History for Kids
-Learn How to Fuel your Creativity at Home
-Learn About How to Walk a Creative Path in your Everyday Life
-How to Encourage a Maker Mindset in your Classroom
-Exploring the Elements of Art at Home with ANYTHING!
-10 Reasons Why Arts Integration in Schools is Important
-How To Guide for First Year Art Teachers: 10 Steps to Success
-How to Teach Art Classroom Rules and Routines in a Fun and Engaging Way
Art for Kids: Tutorials & Ideas
-How to Draw a Silly Landscape, Element of Art: Space Art Lesson for Kids
-How to Draw a Monster, Element of Art: Value Art Lesson for Kids

Want a whole year of art lessons planned for you? My Artastic Collective Art Curriculum has hundreds of art lessons for teachers and homeschool families, ready to teach.
Not Looking for a Whole Curriculum? Grab These Elements of Art Lessons on Their Own
These lessons are available individually in my shop. Tap a cover to see what’s included.


This post contains affiliate links, including links to my own books on Amazon. As an Amazon Associate I earn from qualifying purchases.
Pin it for later

Share this:

Did this help? Leave a reaction
Let's talk about it. Have a question, a photo-worthy result, or a tip for other teachers? Drop it in the comments below.
💬 Leave a comment


Fantastic piece of art!
Thanks!!! means a lot!