

 Play with clay in your art classroom! This is the perfect, free ceramic art lesson that you need to kick start your curriculum. Students will explore the Element of Art: Line, subtractive sculpture technique, and texture through creating Zen Doodle Pinch Pots. Pinch pots are a traditional vessel in ceramic history and is a way to create a strong, durable drinking cup or bowl using your hands and a pinching method to form clay. Designs will be subtracted from the exterior wall using clay tools.
Pinch pots are a form of pottery created through a pinching method. These pots have been created from ancient times to contemporary living. Pinch pots can be both functional and used as a drinking cup or small bowl, or can even be turned into something ornamental. They are great for making vessels, decorations, and even plant pots such as bud vases. Pinch pots are strong vessels that have been created across cultures and times.

Not only can you use this Zen Doodle Ceramic Art lesson to introduce the Element of Art: Line to your classroom, but you can also check out this art teacher’s blog to find a Drawing Art Lesson, Zen Doodle Inspired Henna Hands to further enhance your student’s exposure to using line to create works of art! The Zen Doodle Inspired Henna Hands Art Lesson is your next step in creating a strong unit in your classroom around using “line”, “pattern”, and “repetition” on both two-dimensional and three-dimensional surfaces.

Step 1: Using a wire tool or string, cut off a section of clay that will be a suitable amount to create one, palm sized ball.

Step 2: Wedge the clay to remove trapped air and improve consistency in the clay.
Step 3: Roll the clay into a ball that fits into your palm. Do not overwork the clay as it will dry out. Simply, and gently, roll it into the desired shape.
Step 4: Press your thumb down into the center of the clay. Stop when your thumb is about a half-inch from the bottom of the pot.
Using your thumb in them middle and your forefingers on the exterior wall, lightly pinch the walls of the pot. You do not want to squeeze the walls, it is a gentle pinch.
After you pinch, rotate the pot in your palm. Pinch, and rotate. Pinch, and rotate. Work around the pot over and over, each time thinning your pots walls.

Step 5: As you pinch and rotate the pot in your palm, you will begin to notice the pot’s walls thinning and opening with each rotation.
Step 6: Continue using the pinching method of hand building until your walls are a consistent thickness of about half an inch. 
Step 7: Use your thumb and forefingers to form the pot into a desired shape.
Step 8: Use a soft rib tool to smooth the exterior and interior walls of your pot. Gently press the rib to the pot while you support the opposite side with your fingers. You can use an old gift card as a rib! Use your imagination.
Gently pull the rib across the surface.
Step 9: Continue to smooth until the outside of your pot is smooth.
Step 10: Find a variety of clay tools that you wish to use for subtracting material from the surface of your pot. Anything you want to use to carve is fine! Avoid using needle tools as they are for cutting. Use a metal loop tool, wood tool, or scgraffito tool.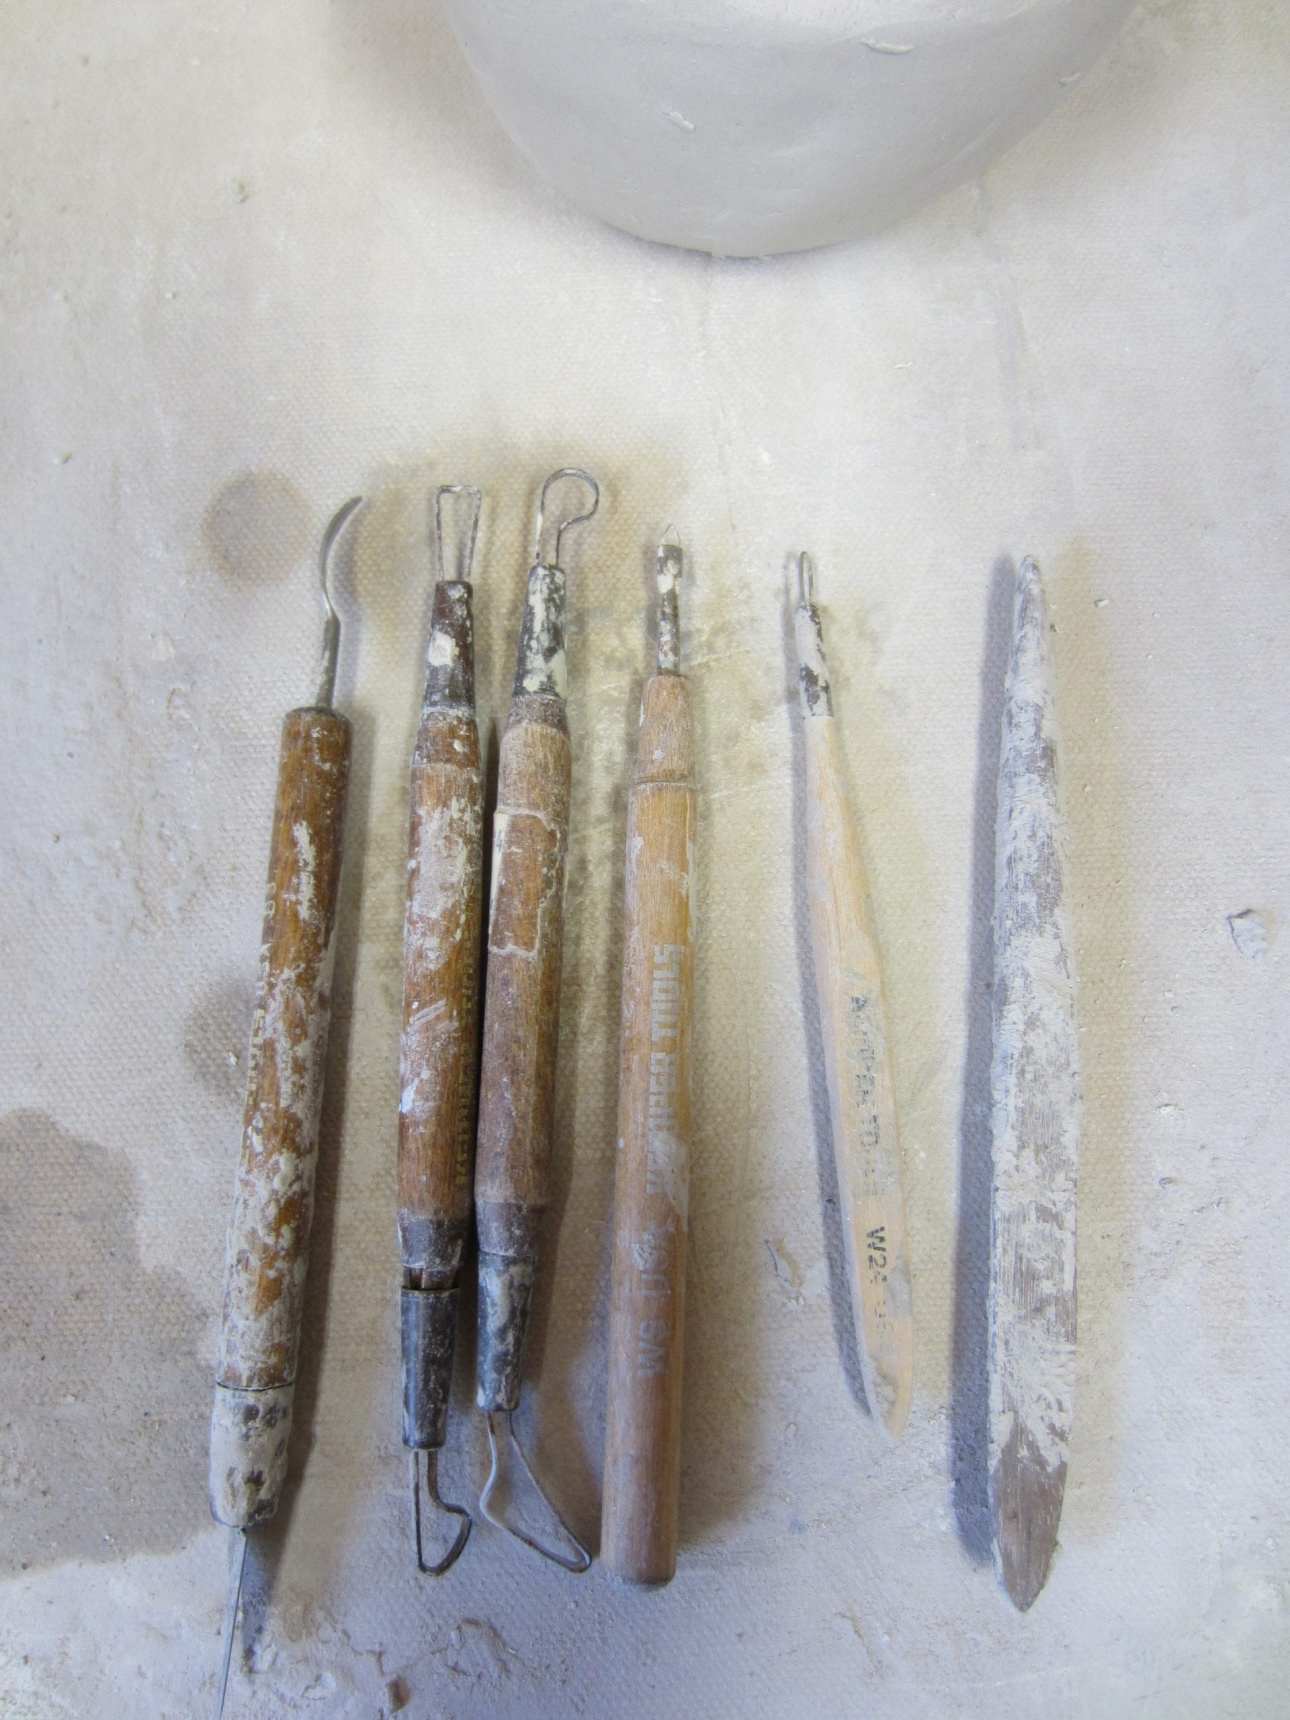
Step 11: Use your clay tool to separate the pot into sections. In each section you will carve out a zen doodle pattern. It is best to make each section about the length of your thumb.
Step 12: Use your tool to carve out your first zen doodle pattern. 
Step 13: In the next section, carve out your second pattern.
Step 14: Continue carving out patterns around your pot. Experiment with a variety of clay tools to see the different marks each one makes. One tool is not enough to do all jobs!

Step 15: Using a spray bottle, spray your canvas board with water to soak the surface.
Step 16: Flip your pot upside down and rotate it on its rim in a circular motion.
Lift it up and you will see a perfectly flat, smooth surface. Remove any slurry with a moist sponge.

Step 17:
STAIN: If you wish to stain the piece, paint the pot with stain when it is leather hard. This is what is done in the example.
GLAZE: If you wish to glaze the piece, apply the glaze to bisque ware only.
Paint your piece inside and out with your choice of stain/glaze.
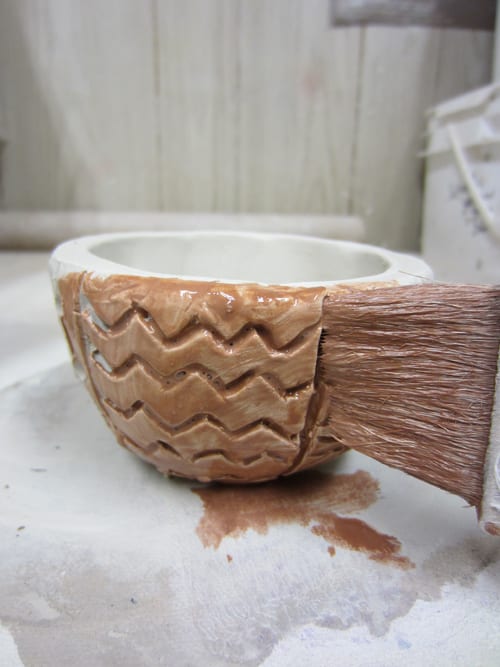
Step 18: Use a moist sponge to gently (do not scrub) wipe off the stain/glaze on the outside wall.
As you wipe it off, material is removed from the outside but is left in the zen doodle patterns. This creates contrast on your surface.

Step 19: Continue wiping until the surface and rim of your pot is the clay body color and the stain or glaze is recessed in the zen doodle patterns and inside of your pot. You are now done your piece! A perfect line art lesson to include in your classroom!
Detail image of Zen Doodle Patterning with recessed stain or glaze in the designs.
Love CONTRAST! If you stain this, glaze with a clear glaze. If you glazed it this way… You’re ready to go!


This is an Art Teachers of TPT Blog Hop! Visit all the blogs in the list to get some AMAZING FREE Art Lessons that can tie in and create a strong art unit in your classroom! All of our Art Lessons are connected so check them out!
- Metal Tooling Using Visual Texture, by Glitter Meets Glue
- Bird Sculptures Using Tactile Texture, by Art is Basic
- Dyed and Stamped Pillows, by Masterpiece Momma
- Relief Printmaking and Colored Pencil, by Look Between the Lines
- Mixed Media Hometown Scenes, by Expressive Monkey
- Zen Doodle Pinch Pots, by Ms Artastic
- Henna Hands Art Lesson, by Picassa’s Palette
- Past and Future Hands, by A Space to Create Art
Save this lesson to your Pinterest account using the image below!


Great idea! I’ll have to try this with my elementary students!
I’m such a visual learner, all the pictures help so much. The end product is beautiful!
You have such a way with clay. I haven’t done a clay project in a million years. Sadly, not enough room to store them properly. However, I’m loving this idea and think I might be able to apply it to air dry clay. Thanks for the awesome idea!
Thanks for sharing this pinch pot lesson! My students LOVE doing zendoodles and this would be a great way to incorporate clay into my curriculum!
I loved seeing your process for making the pinch pots and adding the designs. I did something similar, but let the red slip get leather hard on the white clay, then did a sgraffito technique to reveal white lines. It was a little tricky for elementary students (turned out nice but I didn’t do it again … lol). It seems like your approach might be a little more user-friendly for young students. Thanks for sharing your ideas!
Thank you so much! It is super hard teacher surface techniques with the younger students! This might be easier as they don’t have to carve the surface to get design!
Such an informative lesson! Technical, yet explained simply! I know that whenever we use clay in my classroom, my students love it- they get kinesthetic PINCH of relaxation and a dash of creative ZEN!
Beautiful! Builds nicely on the zentangle unit I did last year with middle school. Do these have to be fired in a kiln or would they air dry sufficiently? I’m not very experienced with 3D media/clay and do not have a kiln at my school, but there is some clay that somehow ended up in my closet, lol. I also have model magic and aid-dry modeling clay, but not quite as much. Thanks in advance!
These have to be fired if you use real clay. If you don’t have a kiln, just use air dry!